
Hi there fellow Crafty People. Welcome to my little blog. I want to share another craft created by my talented daughter Cole. Today, we're hoping we can bring out the artist in you.
Now let's take a look a Cole's DIY Woven Ribbon Art. Then imagine your version of this cute little project.
Materials

- Canvas wrapped wooden frame in your preferred size
- Ribbon in your choice of colours and widths
- Glue or staple gun
You can choose any size canvas that suits the space you intend to hang it in.
Choose ribbon in colours that match items already in the room so that it will coordinate nicely. If you are making it for a bedroom, I suggest you use the bed spread as your colour inspiration.
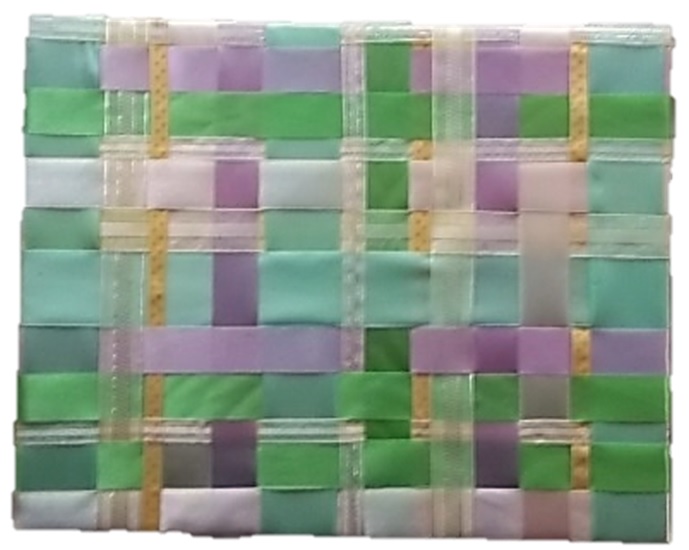
Cole glued the ribbon but I would prefer to use a staple gun. The staples won't show since you are shooting them in the back of the piece.
We have three completed ribbon covered canvases which look fantastic hanging vertically in a straight line. It fill the space perfectly and looks way to pretty.
Directions
- Begin by placing the first ribbon horizontally flush with the front top edge of the canvas.
- Staple both ends to the back of the canvas.
- Place the second ribbon directly below the first one and staple it down on the back of the canvas.
- Continue applying the ribbon horrizontally until the canvas is completely covered.
- Now place your first vertical ribbon on the left side of the canvas and staple that end to the back of the canvas.
- Weave the ribbon in and out between the horizontal ribbons that you already stapled down
- Once you get to the end of the canvas on the right, pull the ribbon around to the back and staple it.
- Continue weaving vertical ribbons across your canvas and stapling as you go.
- Trim excess ribbon off the back to remove bulk.

This project is the perfect way to personalize a room with coordinating colours on a piece of wall art created by you.
Are you going to give it a try?
Well, thanks for stopping by. I hope the instructions were clear enough.
If your interested, stop by my Etsy Shop, Little Shop of Treasures or check out this free printable calendar.
If you would like to receive my blog updates please subscribe via email or follow me on Twitter, Pinterest or Blog Lovin.
Well, thanks for stopping by and have a fantastic day.
Lovely blog. I am a new follower via BlogLovin from the bloghop. Please follow back
ReplyDeletehttp://butterflyintheattic.blogspot.com/2013/05/the-living-desert-in-palm-desert.html
Have a beautiful day
Colleen
Hi Cathy, thanks for the invitation. See you there.
ReplyDeleteHow creative and pretty! Thanks for sharing this lovely post with us over at Showin' Some Love Hump Day Blog Hop! Already following you. :)
ReplyDelete<3 Amanda*
Hi Amanda,
DeleteThanks. They turned out nice. They would look awesome in a girls room.
Funny I read this blog post yesterday :)
ReplyDeleteThank you for sharing in my blog hop! http://contentemeant.blogspot.com/2013/05/what-are-you-doing-wednesday-blog-hop-5.html
Well thanks for coming by - twice and leaving a comment this time.
DeleteThanks for coming to the party, Darlene. Your friend, Linda
ReplyDeleteHi Linda,
DeleteThanks for hosting the party.
Thanks for linking up on the Bloglovin Blog Hop tonight!
ReplyDeleteTake care,
Meg
Happy Kids, Inc
Hi Meg,
DeleteThanks for hosting. I love your blog.
Very crafty!! Thank you for sharing at Party In Polka Dots!! I hope you will come back Monday!
ReplyDeleteShelley
www.piggyinpolkadots.com
Thanks Shelley,
DeleteI look forward to linking up again next Monday and checking out some new blogs.
I am going to try this. I google +'d it and am following with bloglovin. Have a good weekend.
ReplyDeleteThanks Bridgit, that's fantastic. I look forward to connecting more.
DeleteSo glad you brought this to What'd You Do This Weekend. This is a great one to share because for beginning crafters this is a manageable project. Thanks!
ReplyDeleteIt is pretty and easy. I'm sure kids would enjoy making it too.
DeleteSo cool! I haven't done any woven ribbon anything in a long time, though last fall I did weave some paper strips circa 1st grade style!
ReplyDeleteThanks for stopping by my blog earlier.
natashalh
And thanks for stopping by here. I hope to see you again sometime soon.
DeleteOh I love this! So clever and so pretty! I love all the different colors and it would look so pretty on my wall, lol! ;)
ReplyDeleteThanks for linking up to “Making Your Home Sing Monday!” The new linky is live and ready for your posts!
Hi Nan,
DeleteThanks so much. I'll have to check out your linky party.
This is so cute and very creative! Love it :-) Thank you for sharing at our ALL MY BLOGGY FRIENDS party !
ReplyDeleteHi Linda,
DeleteThanks! Nice to see you again! I'm looking forward to linking up at your party.
Cool. Love how it could tie a room together by personalizing the colors to match your decor. Great job. Thanks for sharing and thanks for stopping by my blog earlier.
ReplyDeleteThanks Christa. So happy that you decided to stop by and leave a nice comment. Have a fantastic week!
Deletevery cute. Thanks so much for sharing with Adorned From Above's Blog Hop 55. We can't wait to see what you have for us this week. This weeks party is live.
ReplyDeleteHave a great week.
Debi and Charly @ Adorned From Above
http://www.adornedfromabove.com
Thanks Debi. I have two posts all ready to share.
DeleteHi Susie,
ReplyDeleteThanks for hosting. I look forward to the next party.
Beautiful! I'm sharing this with my daughter - she's going to love this.
ReplyDelete